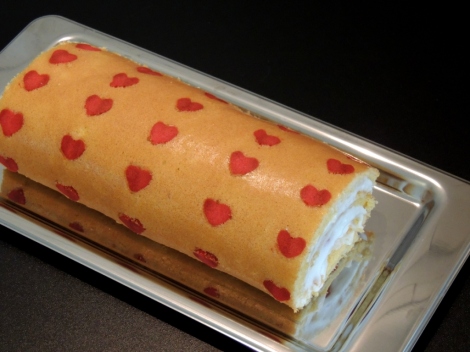
Since I found this video by Raiza, from Dulce Delight, I’ve been intrigued by the technique and today I found the perfect opportunity to bake it: I’m going to have tea with some friends and help them plan a holiday – this is gonna be one long afternoon!
I didn’t use her chocolate sponge, though. First because I didn’t want a chocolate roll (duh!:P), and second because I was in a bit of a hurry so I resorted to my go-to sponge.
CAKE FOR THE PATTERN
INGREDIENTS
1 egg white
30g granulated sugar
40g flour (if making chocolate pattern, substitute 20g for cocoa powder)
20g butter, room temperature
Natural food colouring, fruit syrup or any food colouring
METHOD
Prepare your baking tray putting the pattern you chose under a piece of baking parchment (although your pattern sheet will cover only about half of the tray, the parchment paper should cover the entire tray).
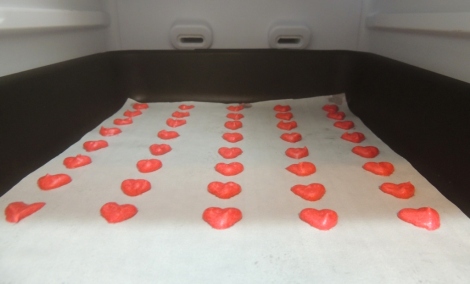
In a small bowl, combine egg white, sugar and flour. Add butter and food colouring. Remember that after baking it’ll fade a bit. Put the batter in a piping bag or small zip bag and cut a tiny corner. Go over your pattern and copy it to the parchment paper.
Put it in the freezer while you make the roll batter.

The chosen pattern – go to Raiza’s blog and choose one of the three patterns available for download or design your own

Into the freezer – make the batter in a contrasting colour and freeze your pattern for a few minutes while you prepare the roll batter
SWISS ROLL
INGREDIENTS
3 eggs
75g caster sugar
75g flour, sifted
METHOD
Preheat oven to 200oC.
Whisk together eggs and sugar until the whisk leaves a trail and the mixture gets light and fluffy (it will take about 5 minutes in stand mixer). Fold in the flour very gently.
Get your tray from the freezer, remove the printed sheet and spread the batter over your pattern, smoothing the surface very carefully.
Bake it for about 15 minutes or until the edges start to pull away from the sides of the tin.
ASSEMBLING
Invert your cake onto a parchment and then flip it over, so that the pattern faces down. Apply your filling – in this case, I used whipped cream and strawberries, halved. Roll up your cake with the help of the parchment. Make sure you start rolling from the end that has no pattern!
NOTES: If you’re thinking of using a portion of the main batter to make your pattern (I thought!), stop! Don’t do it because, once ready, the sponge batter must go to the oven immediately, otherwise it won’t rise properly and will lose its fluffiness – and we don’t want that, right? 😉
If the baking parchment keeps rolling up on you while you’re piping, just use a bit of egg white to “glue” it to the tin.
Raiza explains this Japanese technique in detail, so I recommend you watch the video because it’s very simple once you see her doing it.


super lindo no creo poder hacerlo como el tuyo pero lo intetare gracias solo una pregunta de dode puedo descargar los patrones?
bonito dia
LikeLike
Thank you so much, Nena! It’s not that hard! You definitely should try it 🙂 For the pattern, please go to http://www.delightdulce.com/2013/03/heart-patterned-cake-roll.html. That’s where I got it from and there a few others for you to choose from.
LikeLike
That’s so cool! Nice post!… must try soon.
LikeLike
Thanks, Lenore! I can already imagine the beautiful pics you’ll shoot 😊
LikeLike
How inventive! And jelly rolls can be tricky. I tried it once and mine came out too rubbery. I had to toss it. That was when I first started baking over 40 years ago! I never tried it again since. It looks very good. Nice job! Thank you for following me ; – )
LikeLike
Oh, you should definitely try this recipe – it has never failed me!
LikeLike
such a nice idea!! and the outcome is delicious 🙂
cheers, Oana
LikeLike
Thank you so much, Oana!
LikeLike
this is awesome. im speechless
LikeLike
Isn’t it cute? And, although it may look difficult to make, it’s not 🙂
LikeLike
very, very cute!
LikeLike
Thanks, Kevin!
LikeLike
Omg this is amazing!!! Can’t believe how stunning it turned out!!
LikeLike
If you try making this just don’t ever let the pattern freeze – I’ve been there and it’s ugly!
LikeLike
This is so clever – I love it. What a beautiful roll.
LikeLike
Thanks, Maggie!
LikeLike
Oh that just lifts the roll way out of the ordinary!
LikeLike
Doesn’t it?! 🙂 But don’t leave your pattern too long in the freezer. I made another one yesterday and it got stuck to the paper…
LikeLike
Thanks for the tip!
LikeLike
Oh! It’s so beautiful! I I wish I had the patience to accomplish such a cake!
LikeLike
You’d be surprised by how easy and quick it was! Really, don’t let the finished roll fool you 🙂
LikeLike
Looks perfect, so cute…
What about this filling? Whipped Cream and strawberries?
LikeLike
Exactly, Mi! The whole thing is cloudlike!
LikeLike
OMG, it’s beautiful! It worked!
LikeLike
Yep, it worked fine and it was not that hard! 🙂
LikeLike
This looks so yummy but soooooo hard to make!
LikeLike
No, Barb! It just takes a little extra effort. The first batter I whisked by hand in a cereal bowl and was done in like 2 minutes. I didn’t have a disposable piping bag, so I used a zip bag and cut one of the corners – here I must say it made things more difficult and I didn’t get the hearts as perfect as I wanted. But, with a small tip fitted to a proper bag, you’ll be fine I’m sure. 🙂
LikeLike